This is a smallish (8x13) room off of the back bedroom. Kind of a an odd location, but we were told that our house was once a duplex and that might have been one side's kitchen since there is a large sink there. The walls were a yucky off white and the trim was an even yuckier brown color. The floor, well, the floor was a mess. It was a brown print linoleum that was peeling in some areas and just missing in others. The floors slope to the back corner, the walls were cracking and the sink was a leaky mess. I didn't want to spend much time in there, much less make our dogs spend their time in there. So, the project began.
 |
| Isn't she lovely?? |
 |
| the beautiful peeling floor |
 |
| Our 'junk' room |
 |
| I do love a good sink |
 |
| that's not gonna work |
 |
| this is the crawlspace directly under the mudroom |
 |
| old, old, pipes |
My initial plan was to paint the trim and walls, fix the sink and tile the floor. Oh, and I forgot to mention that during our kitchen reno we had the crew put in 2 new windows for us in the mudroom and install a 'dutch' door. Oh, second thing I forgot to mention - I planned to get this all done while the other half was away for three months.....while I'm a single parent....I wanted to renovate a room....did I mention solo??? Was I crazy? Probably, but hey, Nicole Curtis from Rehab Addict can do it, why can't I?
To Do List
1. Remove old flooring
2. Install new subfloor
3. Install tile
4. Paint trim
5. Paint walls
6. fix sink
I didn't even get passed number 1. I spoke to my cousin (Angie - crime partner in thrifting - who also does contract work) and she thought the flooring might have asbestos and suggested I put the plywood directly on top of the linoleum. Done. I pulled up the old tac strips holding the linoleum down and use shims to even out the floor a more than it was. I really wanted to tile the floor, but the tiles I wanted were out of my price range....I was crushing hard on the concrete tiles in black and white....
 |
| Source |
 |
| Source |
Off to Lowe's (or Home Depot, I don't remember), I bought 3 sheets of a higher grade plywood floor that was 1/2" thick, I made sure it was sanded already on one side since I was using it as my actual flooring. I also had the big box lumber store cut the plywood into 6" and 8" strips for me. Yes, I could have done this, I do have a table saw, but why when it's cheep/free for them to do it? Big Bonus - it's easier to transport cut up too!
I brought it home and with the help of my gracious mother, we sanded the strips even more, just to take off any potential splinters. The room was narrow enough that one strip of plywood would go from end to end and I would only have to trim it a few inches to make it fit.
Once all the plywood had been sanded and cut to size, I used my crown stapler to nail the boards down directly onto the linoleum floor. We used a few pennies as spacers and it went relatively quick.
Once all the boards were nailed down, we decided to paint to the walls. I used the same gray color that is most of the rest of the house. And the trim was just your basic white trim paint.
 |
| Wall color - Sherwin Williams in Propper Gray |
Once the walls and trim were done, it was time to get started on the floor. I read a ton of 'how to's' and pinterest articles and blogs and they were all different on how they did things. I wanted to make sure this floor was super protected since it would be the doggie room. I didn't want a drop of water to ruin the entire floor. So, I primed the floor with an oil based floor primer I bought at HD for $23, I'm a bad blogger, I forgot to take a picture....
Even painted/primed white, the floor looked so much better than the original nastiness.
 |
| what a 180 degree change! |
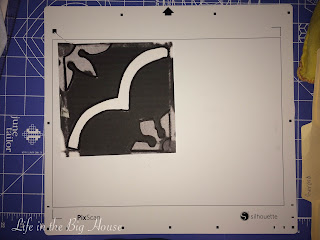
I found several designs I loved and reached out to my Facebook friends for their suggestions. I thought I had a favorite picked out and then I started to think about the logistics of making it a stencil....um, way too may intricate details.
 |
| final four |
 |
| and the winner....not any of the four |
I let JD pick the base color and he chose a dark navy color that looks really good.
 |
| We used this for the both the navy and the white |
 |
| Valspar in Fairmont Penthouse Mos Blue |
And we decided on a white for the stencil color.
Now onto stenciling....it started off easy enough, and then I started to get paint on the backside of the stencil. Enter baby wipes (these are amazing at cleaning wet oops-I-missed spots). I soon realized that I had to clean off the stencil EACH and EVERY time I stenciled the design...that's when I realized this was going to take a while. I had a large piece of foam board that I used as a make shift cleaner surface in hopes of the making the process go a bit quicker than if I were to run to the kitchen each time. I guess it help, because 10 days, 4 stencils, 2 X-Acto knife blades, 1 package of baby wipes, and 4 stencil brushes later, it was done.
 |
| all nice and clean |
 |
| not too shabby looking |
 |
| Stencil color - Valspar in Woodlawn Dewkist |
 |
| this look says it all... |
Once the stenciling was completed, I celebrated!!! whoohooo!! haha, I wish, next up, floor sealing. Again, lots of research went into this as well since I was worried the previous 3 layers of paint wouldn't be enough to stand up to our 3 dogs.
I decided to go with Rust-O-Leum's Verathane sealer for high traffic areas. Now, they have a different one that is just for floors, but for some reason the 'high traffic' aspect of this sealer spoke to me...I don't know, maybe I was delirious after the 10 days of non-stop stenciling...
 |
| and there you have it, all done! |
Oh, my apologies, JD wasn't available again to proof, so there are probably several errors...


