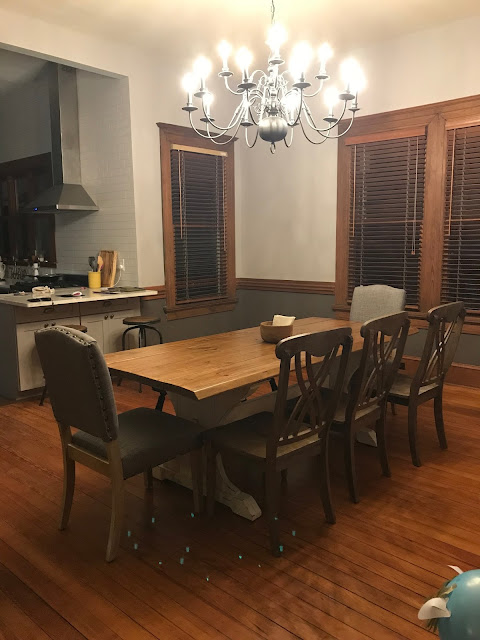
Nope, we didn't build a house. Or even a play house. We built a table! I know, I know, you have probably seen a MILLION table 'how to's' in just the past week alone. And honestly, that's why we thought we could do it. After all, according to Pinterest - anyone can build a table, right? All you need is screws, a drill and some wood...right? WRONG! Ok, so maybe McGyver can build a table with less than that, but we quickly learned that even though we thought we had all the tools needed, we actually needed more (yay! more tools!!!)(not being sarcastic, I do love my tools!). Perfect example, I have asked for (and received) a table saw, wet/dry vac, nail gun, and a composter - ok so a composter isn't a tool necessarily, but still!)
Ok, so back to why I am writing this post. The table.
As long as I've lived on my own, I've used an antique table that was given to me by my aunt. It wasn't a family piece, but it was still special and I love having something different than what I could find at a big box store. It was always big enough for me and a few friends. JD and I even used it after we got married. All in all, I'd say I've had that table for about twelve years.
 |
| Here she is in my first house...not a great pic...unless I wanted a pic of my dog licking her butt... |
 |
| We were still unpacking {current casa} |
 |
| another stellar photo..... |
 |
| and the photos of when I listed her for sale |
Apparently I don't believe in using my shmancy-fancy camera to take photos....
Anyways.
After we remodeled our kitchen and opened up a wall, our dining room felt even larger than it was and the small antique table just didn't quite fit any more. And like any other person, we took to Pinterest for ideas.
We loved the farmhouse table look - I know so original these days.
I saw tons of plans on how to build various kinds, but none of them looked like what I had in my mind. I finally found a photo of the perfect table, but sadly it was just a photo with no directions. We looked around at several stores and all of the tables we liked were at least $600! Just the table, no chairs!! And those tables were still not the 'perfect' vision I had in my head.
 |
| ah, the 'almost' perfect table. |
Backstory time. Once a long time ago (before Pinterest- circa 2010), I wanted to build a window seat and didn't have any plans. So, I made my own and with JD's help, we built the window seat and I have to say it turned out pretty well. So well that two different owners of a past house of ours, still have it in their bedroom. OR maybe they just can't find the right replacement.....anyways, it has survived 3 families and 7 years. Not too shabby.
 |
| designed by me! Built by JD and me! |
Fast forward to present day (ok, not present day, but March of last year - yes, I am a little late on this one....). I kept going back to that photo of the table that I realllllyyyy loved that had no directions...I did what I did back in 2010 and drew up some plans on how to build the table. Not the prettiest sketch, but it gave us a rough idea of what materials we would need to build our dream table.
 |
| I think we got the point... |
And so we bought the materials, borrowed a Kreg Jig and built ourselves a table. Start to finish, I think it took us between one and two weeks to finish.
 |
| experimenting with the angles |
 |
| LOVE THE KREG JIG |
Once we had all of the base parts cut and sanded, we stained the wood with Early American wood stain from Minwax. A few lessons learned, don't use plain wood putty, it won't take the stain the same as the wood. Try to find a wood putty that is already tinted and that closely matches the stain color you are using.
After the base stain color had dried, I rubbed some random areas with vaseline (where it would normally show wear and tear), then we used Valspar Chalky Finish paint in Kid Gloves and painted the entire base. Once the paint dried, I sanded the areas to reveal the stain. The paint came off super easy in the areas where the vaseline was, almost too well and I had to go back and repaint a few of the larger areas...my table looked like a giraffe! Not a good look.
 |
| I might have been a bit messy... |
Now time for the top of the table. We used four 2x12's. We tried to distress aka beat them up as much as we could and then used the same stain as we did for the table base. After a couple of layers of the stain, we used a clear coat of prolycrylic (Minwax water based in clear satin) to seal the wood. You know, to keep it looking old....
 |
| No horrible smell *BONUS* |
Now time to assemble the top. We made a big mistake here. Before we distressed the wood, we should have run the planks through my table saw to get them nice and straight....DO NOT SKIP THIS, IT WILL SAVE YOU MAJOR HEADACHES. But since we did skip this, we had the headaches.
We thought we had purchased the straightest planks of wood from the store, and we probably did...but once we tried to join them together we found out we were wrong...big time wrong....Instead of going back and redoing our table top, we fought with the planks until we got them right. This fight involved the Kreg Jig (we have since bought one, love it!) and strapping the wood planks together and using all the brute strength we could muster.
 |
| we had to use some extra wood to screw all of the top planks onto |
Once the top was complete, we attached the top to the base, and voila! We had ourselves a table! Almost...
 |
| We adjusted the length using the 2x6 under the table |
 |
| the non-painted stripe is where the table legs should have been - easy to fix - thank goodness |
 |
| Ok, now we have a table! |
We still need a longer bench for one side, but other than that, it has held up pretty well. Meaning, it hasn't fallen apart on us in almost a year..
We do have new chairs that replaced the black ones. They were Target purchases - four for $100! The fact that they were so cheap, might explain why I can't find them anymore to post a link here....but here are some
similar ones. And the cloth ones on the ends were an Overstock purchase. We got the pair for $75, they were in the 'AS IS' section - we still haven't figured out what was wrong with them.
We love our table, we love the way it fits in the dining room, and we especially love the fact that we built it ourselves.
 |
| comparing the new chair with the old chair |
 |
| suggestions on a longer bench??? |
 |
| Overstock.com chair |
 |
| The Target chair |
So there you have it, our biggest build yet. What's next? You never know in a house as old as this one!
Oh - sorry for any grammatical errors...my proof reader is on a 15 hour flight to S. Korea....and as a UGA Alumni, he's extremely upset he's missing the college football National Championship. So in his honor ~ GO DAWGS!!!!!
AND HAPPY NEW YEAR!


0 comments:
Post a Comment